Overview
Have you seen projects where a robot is controlled by a phone, tablet, or
computer over the internet? BrowserBot lets you do exactly that — quickly
and easily. It is a simple example project that demonstrates how to drive a
BrickPi3 LEGO robot through any modern web browser using on-screen buttons
or keyboard shortcuts.
The Raspberry Pi runs a lightweight Python
Tornado
web server that serves the control page and relays WebSocket messages to the
BrickPi3 motors in real time. No app installation or pairing is required —
just open the IP address of your Raspberry Pi in a browser.
How It Works
BrowserBot uses WebSockets to pass messages between your browser and the robot:
- The Tornado server on the Raspberry Pi serves
Browser_Client_Code.html — the control page.
- You open that page on any device on the same network.
- Pressing the on-screen arrow buttons (or the corresponding keyboard keys) sends a WebSocket message to the server.
- The server receives the command and calls the BrickPi3 API to set motor speeds accordingly.
- Releasing a button sends a stop command, halting the motors immediately.
An optional camera streaming add-on (stream_server.py +
streaming_client.html) lets you view a live video feed from the
Raspberry Pi Camera in the same browser window.
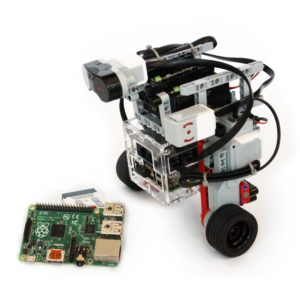
Parts Required
- BrickPi3 (Base Kit or Core Kit)
- Raspberry Pi (Pi 3 or Pi 4 recommended)
- 2 × LEGO EV3 Large Motors (for drive wheels)
- LEGO structural parts for the robot chassis
- microSD card with Raspberry Pi OS Trixie for BrickPi3
- 12 V battery pack for BrickPi3
- Wi-Fi connection (robot and controlling device must be on the same network)
- Optional: Raspberry Pi Camera Module for live video streaming
Motor Connections
Connect the drive motors to the BrickPi3 motor ports:
- Left drive motor → Motor Port A
- Right drive motor → Motor Port D
If you use different ports, update the port constants at the top of
RPi_Server_Code.py before running.
Software Setup
1. Install the BrickPi3 libraries
If you're using Raspberry Pi OS Trixie for BrickPi3 the libraries are already
installed. Otherwise, follow
Option B from the Installation FAQ.
2. Install Tornado
Tornado is the Python web framework used by the BrowserBot server:
sudo pip install tornado
3. Run the server
Navigate to the BrowserBot project folder (inside the BrickPi3 repository
cloned in step 1):
cd ~/BrickPi3/Projects/BrowserBot
sudo python RPi_Server_Code.py
The server starts on port 9093 by default. You should see a
message confirming it is listening.
4. Open the control page
On any device connected to the same Wi-Fi network, open a browser and go to:
http://<raspberry-pi-ip>:9093
Replace <raspberry-pi-ip> with your Pi's local IP address
(find it with hostname -I). The BrowserBot control page will load
with forward, back, left, and right buttons. You can also use the
W / A / S / D or arrow keys on a keyboard.
5. Optional: Live camera stream
To add a live video feed, run the streaming server in a second terminal:
sudo python stream_server.py
Then open streaming_client.html in your browser to view the feed
alongside the controls.
Source Code
All source code is free and open source on GitHub:
Key files in the repository:
RPi_Server_Code.py — Tornado WebSocket server; handles motor commandsBrowser_Client_Code.html — the control page served to browserscamera_streamer.py — captures frames from the Pi Camerastream_server.py — streams camera frames over HTTPstreaming_client.html — browser page that shows the live feed
Control Your Robot from Any Browser
All source code is free and open source. Share your build on the community forum!